Monday, February 28, 2011

Chocolate and Cheese Danish


Oh how quickly Mondays come upon us :( My day is finally winding down with pumpkin cheesecake ice cream and "The Bachelor".

This past week was Shawn's week off and it flew by. I sent him off this morning with homemade whole wheat peanut butter banana pancakes and a sausage, cheese and tomato scramble. It's the least I could do...

His next week off is in 3 weeks...boooo...but it is also my Spring Break so something tells me these next 3 weeks are going to draaaag...and I have tons and tons of work to do to catch up and finish this quarter strong...

This of course equals lots of stress eating...crap...Luckily, I made these danish (is it danish or danishes?) a few weeks ago because if I made them now I would probably eat them all in one sitting...no joke.

I made these with croissant dough because I had it on hand but I'm sure its a lot better with puff pastry. If cheese and chocolate are food groups to you like they are me, then try these...now...seriously.

Chocolate and Cheese Danish
From Foodnetwork.com

Ingredients:

1/4 cup (2 ounces) cream cheese, at room temperature
1/4 cup (2 ounces) mascarpone cheese, at room temperature
1 egg yolk
1 tablespoon all-purpose flour
3 tablespoons sugar
1/2 teaspoon pure vanilla extract
1/8 teaspoon fine sea salt
1/2 cup mini chocolate chips
2 (9-inch-square) sheets frozen puff pastry, thawed
1 egg, beaten

Directions:

Put an oven rack in the center of the oven. Preheat the oven to 400 degrees F. Line 2 baking sheets with parchment paper. Set aside.

Filling: In a small bowl, mix together the cheeses, egg yolk, flour, sugar, vanilla and salt until smooth. Fold in the chocolate chips. Set aside.

Cut each sheet of pastry into 4 equal-sized squares. Put 4 pastry squares on each prepared baking sheet. Spoon about 2 to 3 teaspoons of the filling into the center of each piece of pastry. Fold 1 corner of the pastry diagonally over the filling to within 1-inch of the opposite corner. Using a pastry brush, brush the folded-over section lightly with the beaten egg. Fold the opposite corner over the egg-brushed pastry to form an open-ended Danish. Brush the pastry with beaten egg and bake until puffed and golden, about 15 minutes. Remove from the oven and cool for 5 minutes before serving.

Share/Bookmark

Wednesday, February 23, 2011

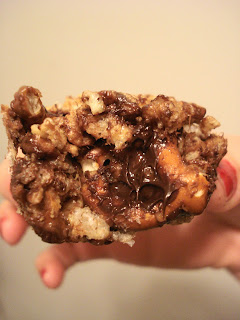
Chocolate, Peanut Butter and Pretzel Treats


I will be the first to admit that oftentimes my food or presentation of my food is not that pretty per se. I mean I get it. I'm aware....

Many times this is because I either A.) I don't have the patience to make it pretty because I want to get to the eating part... B.) I care more about how it tastes than it looks...or C.) I don't have a very good camera

This lovely treat that I threw together is a little bit of all of the above... A, B and C.

As I have said many times before I have this little obsession with the chocolate, peanut butter and pretzel combination. Remember my Love Triangle Cookie? Yeah, anything like that!

I had some rice crispy cereal and marshmallows laying around and decided to try to have some fun with them and make a few fun things...this is the first fun thing (since the Whatchamacallits)...and by fun I mean super, sinfully awesome.

Sure, its not that pretty. In fact, its a bit of a mess but I'm gonna call that fun...because the taste sooo makes up for it :)

Chocolate, Peanut Butter and Pretzel Treats
Dame Good

Ingredients:

1/4 cup butter or margarine
1 (10 ounce) package regular marshmallows
1/2 cup peanut butter
3 cups Crisp Rice cereal
1 1/2 cups broken pretzels (break each pretzel into 4 pieces)
1 1/2 cups semi sweet chocolate chips

Directions:

Spray a large bowl with cooking spray. Add the cereal, pretzels and chocolate and mix up.

In large saucepan melt butter over low heat. Add marshmallows and stir until completely melted. Remove from heat. Stir in peanut butter until melted.

Pour the marshmallow mixture over top of the cereal mixture. With a spatula that is sprayed with cooking spray, combine the two mixtures and stir until everything is evenly coated. The chocolate will begin to melt, but that okay.

Spray a 9x13 pan with cooking spray (or an 8x8 pan if you want thicker bars). Using a spatula evenly press mixture into prepared pan. Let cool for about 15-30 minutes. Cut into even squares.

Share/Bookmark

Monday, February 21, 2011

Chicken Sausage with a Quick Homemade Sauerkraut


I have got a bad case of the Mondays. Anyone who likes mondays is crazy. Productive is the last thing I want to be on this day. I woke up wanting homemade whole wheat blueberry waffles (which I satisfied myself with happily) and to stay in bed in my warmest PJ's and watch movies with Shawn...

Of course, this just was not allowed as I had to get to work right away (after the waffles of course, and coffee...lots of coffee) then class immediately after until 6:30...yep, me and Mondays are not friends.

As this winter quarter is slowly nearing an end, I am finding that I am burnt out and in dire need of a vacation. I can't afford one so the one week break I get off from school will have to do. For the longest time now I have been grinding out day after day with either class or work or both...0 days off...ZERO

Totally getting to me now...feeling worn down and overwhelmed. Perhaps the fact that it is totally crappy out doesn't help. This morning it was raining and now it is snowing...the kind of snowflakes that are as big as my fist. Boooo!

I think I am done being a Debbie Downer...I'm going to find chocolate and watch "The Bachelor" :)

Ps, if you love sauerkraut, as I do...but find the stuff out of a can or jar or bag or what have you to be rather one-note and sometimes too sour...this homemade quick kraut rocks...its delish...honestly. I have never had chicken sausage before making this recipe and while it is definitely not the fatty oily sausage we all love, it is pretty yummy...

Chicken Sausage with a Quick Homemade Sauerkraut
From Eatingwell.com

Ingredients:

1 12-ounce package chicken sausage
1 teaspoon extra-virgin olive oil
1 small onion, sliced
1 Granny Smith apple, thinly sliced
1 10-ounce package shredded cabbage, preferably finely shredded
1/4 cup cider vinegar
1/4 teaspoon salt
1 cup apple cider
1 teaspoon caraway seeds

Directions:

Cook sausages in a large skillet over medium-high heat until brown on all sides, 2 to 3 minutes. Transfer to a plate.

Heat oil in the pan over medium-high heat. Add onion and apple and cook, stirring constantly, until beginning to brown, 1 to 2 minutes. Add cabbage, vinegar and salt and cook, stirring often, until just wilted, about 2 minutes. Add cider and caraway seeds; bring to a boil. Return the sausages to the pan, cover, reduce heat to a simmer and cook until the sausages are heated through and cabbage is tender, about 10 minutes.


Share/Bookmark

Wednesday, February 16, 2011

Winter Wonderland Sugar Cookies


I am so incredibly excited by this shift in weather. I was able to go outside today without a jacket no problem. For those of you who live in states where your sunshine is loyal to you, you have no idea what I am talking about. But here in Ohio you can never count on what the weather will be like. You always have to leave the house in a bikini, rain boots and a parka...its insane...

no joke...

I am writing this blog with the window open and the breeze flowing and I am loving it. I hate winter...I love the snow for about 2 weeks and then I spend the rest of the season in hibernation cursing mother nature.

Back when the ground was covered in snow and the wind was blistering cold I lost my car keys...remember my long drawn out stressful post? Yeah, back then. Two of my classmates were nice enough to help me search out in that horrible weather so I owed them....big time...

One of them requested sugar cookies but I wanted to make them special by rolling them around in pretty sanding sugar for some sparkle and shine. The winter weather inspired me so I went for blue and clear. Of course you can do these with any colors for any occasion...

I post this in hopes of kissing winter goodbye soon and welcoming my second favorite season...crossing my fingers...

Though I still have an unbrella, scarf and flip flops packed for tomorrow ;)

Winter Wonderland Sugar Cookies
Adapted from allrecipes.com

Ingredients:

2 3/4 cups all-purpose flour
1 teaspoon baking soda
1/2 teaspoon baking powder
1 cup butter, softened
1 1/2 cups white sugar
1 egg
1 teaspoon vanilla extract
1/2 cup colored sanding sugar

Directions:

Preheat oven to 375 degrees F. In a small bowl, stir together flour, baking soda, and baking powder. Set aside.

In a large bowl, cream together the butter and sugar until smooth. Beat in egg and vanilla. Gradually blend in the dry ingredients. Roll rounded teaspoonfuls of dough into balls, roll the balls in sanding sugar and place onto ungreased cookie sheets. Push the tops down just a tad so they spread nicely.

Bake 8 to 10 minutes in the preheated oven, or until golden. Let stand on cookie sheet two minutes before removing to cool on wire racks.


Share/Bookmark

Monday, February 14, 2011

Cake Mix Pudding Cookies


Happy Valentines Day everyone! Hope everyone is having a lovely holiday. Unfortunately for me, Shawn and I didn't get to spend much time together today but we did get to celebrate Vday yesterday. We decided to have a laid back, no fuss holiday. We just wanted to spend quality time together so we decided to make dinner together. This never happens as I am the queen of the kitchen...

I actually like cooking with him. Which is surprising because I tend to bite those who enter my kitchen while I am hard at work...true story. I was even nice enough to let him pick out the main course and the sides...as long as I got to pick dessert...

duh...

Shawn and I have two total opposite preferences when it comes to dessert. He likes things light, refreshing and fruity while I like rich, indulgent dessert. I was feeling romantic I guess and decided to make a "Shawn" dessert and a "Tarrah" dessert...

A strawberry angel food cake roll and a dark chocolate truffle cheesecake (both of which are lighter, slightly guilt-free recipes!)

Why I get so ambitious is beyond me...

But it worked out...for the most part...but the details will come when I post the said recipes. He chose a grilled salmon, wild rice and salad. We had a light and delicous meal and it was fabulous. He insisted on buying all the food and was such a jerk that he brought me my favorite color rose, peach, but I was prepared.

I know when I am on the road I love snacks and he is constantly on the road so I scoured the grocery store for all his favorites and even some stuff that I thought he would like and put together an "on the road survival kit" if you will...ha! Oh, and Kirby also got him a card so I had to throw together something small...

None of this is relevant to todays post...so onward!

I came up with these cookies to make for the woman who always does my hair. When I lost my car keys a few weeks ago (remember that long stressful post?) I missed my hair appointment and felt bad that I took up space on her schedule.

Cookies fix everything if you ask me so I searched my pantry and found a box of spice cake mix and a box of pumpkin spice pudding and was determined to make something out of it. The inspiration from the cake mix cookies I posted was still present so I figured I'd throw a little something something together and it worked!

These were fluffy cake-like cookies that I could not stop "testing". The pudding made them super moist and almost fudgy...I say everyone who reads this should go through their pantry and try to find these things and mix and match with different flavors...

fun fun!

Cake Mix Pudding Cookies
Dame Good

Ingredients:

2 eggs
1 (18.25 ounce) package cake mix
1 (3.4 oz) package dry instant pudding mix
1/2 cup vegetable oil
3 1/2 tablespoons water

Directions:

Mix together cake mix, pudding mix, eggs and oil and water in a large bowl.

Scoop dough using a cookie scoop and set on ungreased cookie sheets. Flatten the top slightly.

Bake at 350 degrees F  for 8 - 10 minutes.


Share/Bookmark

Friday, February 11, 2011

Classic Dog Cookies


I may or may not have mentioned how Kirby got neutered a couple weeks ago. Poor thing was not happy about it. Since then he has kind of been acting up and misbehaving and basically driving me insane. Slowly but surely his behavior seems to be settling down...

To show him I appreciate him behaving more I made the little turd some homemade treats. He loved this and they were easy. :)

Classic Dog Treats
From Allrecipes.com

Ingredients:

1 cup rolled oats
1/3 cup margarine
1 cup boiling water
3/4 cup cornmeal
2 teaspoons white sugar
2 teaspoons beef bouillon granules
1/2 cup milk
1 cup shredded Cheddar cheese
1 egg, beaten
3 cups whole wheat flour

Directions:

Preheat oven to 325 degrees F (165 degrees C). In a large bowl, combine rolled oats, margarine, and boiling water. Let stand 10 minutes. Grease cookie sheets.

Thoroughly stir in cornmeal, sugar, bouillon, milk, Cheddar cheese, and egg. Mix in flour, 1 cup at a time, until a stiff dough has formed.

Knead dough on a lightly floured surface, mixing in additional flour as necessary until dough is smooth and no longer sticky. Roll or pat out dough to 1/2" thickness. Cut with cookie cutter (I prefer bone shaped), and place 1 inch apart onto the prepared cookie sheets.

Bake 35 to 45 minutes in the preheated oven, until golden brown. Cool before serving. Store in a loosely covered container.


\
little gremlin bathtime!!


Share/Bookmark

Tuesday, February 8, 2011

Peanut Pretzel Bark


Does anyone remember when I went through that bark craze (which I put on hold until my waistline shrinks some more)? Well this stuff is to blame. I made this over the holidays and was so amazed with how awesome it was that I ate maybe half of the pan...true story.

Part of what amazed me was the fact that I found white chocolate to be delicious. Ever since I was a little tot, I have shuttered at the thought of white chocolate. I think everyone has one of these experiences with some type of food. I remember one easter I ate a giant white chocolate bunny...

Which ended up all over the place. My stomache did not agree with the bunny if you catch my drift. Since then, I have not been fond of chocolate bunnies, particularly white chocolate ones. Blegh, I can taste that bunny now.

Anyway, I decided to give white chocolate another chance. I like to give the benefit of a doubt. Plus, I really really loved the idea of peanuts and pretzels and chocolate. Sure it would be awesome with milk or dark chocolate but the white was more "holiday-y" to me.

I am so fricking glad I decided to forgive white chocolate because this was amazing. I LOVED it and will most likely be making it every holiday to come. Gosh I want some now...:/

Peanut Pretzel Bark
From foodnetwork.com

Ingredients:

18 (1-ounce) squares white chocolate
3 cups skinny pretzel sticks, broken into small pieces but not crushed, then measured
2 cups dry salted peanuts

Directions:

Line a rimmed cookie sheet with parchment or waxed paper.

Melt the chocolate in a double boiler over simmering water until smooth, or melt in the microwave in a 2 quart glass dish. Microwave on high (100 percent) for 1 minute, stir, and microwave on high for 1 minute more. If necessary, microwave on high for 10 seconds more, and stir until the chocolate is melted and smooth. Stir in the pretzel pieces and peanuts. Stir well with a flexible spatula.

Spoon onto the prepared cookie sheet, spreading the mixture out so that ingredients are relatively evenly distributed.

Allow for the chocolate to cool for several hours or refrigerate for about 45 minutes, until firm. Break the bark into irregular pieces, like peanut brittle. Store in cookie tins, or package in Chinese food take-out cartons lined with waxed paper.
Share/Bookmark

Chocolate Tiramisu

I love trashy relaity television. I realize I should probably be ashamed and keep this information under wraps but I do not care. I am not ashamed. I don't care who knows it. The trashier the better! There, I said it.

For the season premier of "The Jersey Shore" (yep, love it) my friends and I had an Italian Potluck (yep, we got made fun of). I don't care what anyone says, the show is HILARIOUS! Maybe I like trashy tv because it makes my life seem less crazy and dramatic, who knows. Anyways, I made this chocolate tiramisu.

Its to die for...really. And I am not even a huge fan of tiramisu (I realize that this too may be an unbelieveable Tarrah-fact that makes me crazy). It was the chocolate part, the chocolate intrigued me.

So much so that neither of the 2 grocery stores I searched up and down had lady fingers so I determined that I would make my own. How hard could it be right?

Wrong! This was an experience very similar to my angel food cake one. Aka: disaster. I attempted twice to make these seemingly easy little devils. The taste was right but the texture was oh so wrong. They were flat...like pancakes but I made do and layered them anyway and threw together with this semi-tiramisu.

I added whipped cream and if you ask me that covers any and all mistakes...that and sprinkles but shaved chocolate will do...sprinkles would be just silly.

I still don't know what I did wrong but I ate a very generous portion of this so I don't think it matters. I will probably never try to make ladyfingers again...although I am a firm believer in 3rd times a charm....so we'll see...

Chocolate Tiramisu
Adapted from foodnetwork.com

Ingredients:

8 ounces best-quality semisweet chocolate, chopped
2 ounces bittersweet chocolate, shaved
2 cups heavy cream
8 ounces mascarpone
2 cups espresso or very strong coffee, cooled
1/3 cup coffee liqueur (recommended: Kahlua)
About 44 ladyfingers (available at supermarkets and Italian bakeries)
2 cups fat-free whipped topping
Powdered sugar

Directions:

Place the chopped chocolate in a large bowl. In a saucepan, bring the cream to a simmer over medium-high heat. Quickly pour the hot cream over the chocolate and let sit for 1 minute; then whisk together until the chocolate is melted. Whisk in the mascarpone, then strain into a bowl big enough to whip the mixture in the next day. Cover and refrigerate at least 6 hours or overnight.

Remove the chocolate mixture from the refrigerator and whip until fluffy and slightly stiffened, being careful not to overwhip (like heavy cream, the mixture can turn to butter if whipped too long). Refrigerate.

Combine the espresso and coffee liqueur in a shallow dish. Pick up 1 ladyfinger, then place it in the espresso for just as long as it takes you to pick up the next 1 and place it in the espresso (about 10 seconds). Fish the first 1 out and place it in the bottom of a 9 by 13-inch baking dish. Repeat with the remaining ladyfingers, arranging them in rows in the bottom of the dish and continuously adding and removing the ladyfingers from the espresso mixture. (This will allow them to soak for the perfect amount of time without getting soggy--they should be wet on the outside but still have an unsoaked core at the center.)

When you have made a complete layer of ladyfingers, spread half of the chocolate mixture over the ladyfingers and cover lightly with some of the chocolate shavings. Repeat, making 1 more complete layer of ladyfingers, chocolate, whipped topping and shavings. Cover and refrigerate until ready to serve, at least 2 hours.

Serve cold, dishing out spoonfuls with a large serving spoon. Sprinkle with powdered sugar, if desired.
Share/Bookmark
Related Posts Plugin for WordPress, Blogger...