Sunday, April 29, 2012

Breakfast Casserole

I have fallen off the radar yet again.

I don't want to neglect the blog but sometimes I have no choice.

Life sure has kept me busy.

I have been training for a new job that is actually in my career field (exciting!) My newest "internship" has kept me quite busy. Not to mention this is my last quarter of college ever (Dear God I hope so. 6 years is far too much).
It's been a good kind of busy.

I've been working hard.

In fact, one thing that I have been devoting so much time to is an assignment where we had to interpret a song. I, of course, go and pick a really hard song because I wanted a challenge. Challenge it was. Indeed.

Everyone and their mother has seen it now so I suppose I can share it here...this is proof that I have been busy!

It is not perfect. It is far from perfect. But I am proud that I was able to stand up there without fainting from nervousness...

Me interpreting "Love the Way You Lie" by Eminem...eek!

Please don't laugh :/

Anyways. Food. Here's some!
Breakfast Casserole
Adapted from Allrecipes.com

Ingredients:

1 pound ground turkey sausage
1 teaspoon mustard powder
4 eggs, beaten
2 cups skim milk
6 slices wheat bread, toasted and cut into cubes
8 ounces reduced-fat Cheddar cheese, shredded
1 small onion, chopped salt and pepper to taste
1/2 cup green onions, chopped (optional)

 Directions:

Crumble sausage into a medium skillet. Cook over medium heat until evenly brown; drain. Add onions to the pan and cook about 5 minutes.

In a medium bowl, mix together mustard powder, salt, eggs and milk. Add the sausage, onion, bread cubes, and cheese, and stir to coat evenly. Pour into a greased 9x13 inch baking dish.

Cover, and chill in the refrigerator for 8 hours, or overnight. Preheat oven to 350 degrees F (175 degrees C). Cover, and bake 45 to 60 minutes. Uncover, and reduce temperature to 325 degrees F (165 degrees C). Bake for an additional 30 minutes, or until set.

Top with green onions.

Sunday, April 15, 2012

Pumpkin Roll Bars


I have an intense itch to go shopping...

Unfortunately, I don't have the appropriate funds to scratch this itch.


Maybe it's the warm breeze outside right now or the sunshine that is giving me the urge to buy a bunch of spring-friendly clothes that are pastel/neon-colored and flowy.

My wardrobe is suddenly boring to me.


My only resort is to "fake shop"...which is essentially torture but I do it anyway. I obsessively add articles of clothing and various accessories to my virtual wishlist's as if I may magically inherit a large sum of money that I could apply to my urge to shop.

Here's hoping.


Pumpkin Roll Bars
From Sixsistersstuff.com

Ingredients:

Cake
6 tablespoons unsalted butter, melted
1 1/2 cups granulated sugar
2 large eggs
1 (15 oz.) can pumpkin
1/4 cup water
2 cups all-purpose flour
2 teaspoons ground cinnamon
1/2 teaspoon ground cloves
1/2 teaspoon ground ginger
1/2 teaspoon ground nutmeg
1 teaspoon vanilla
1 teaspoon baking soda
1/2 teaspoon baking powder
1/4 teaspoon salt

Cream Cheese Filling
8 ounces cream cheese, softened
1/4 cup granulated sugar
1/2 teaspoon vanilla
1 large egg

Directions:

Preheat oven to 350 degrees. Spray a 9 x 13 inch baking pan with non-stick cooking spray. In a bowl, with an electric mixer on medium speed, beat butter and 1 1/2 cups sugar until smooth. Beat in 2 eggs, pumpkin, 1 teaspoon of vanilla and water until well blended. In a separate bowl, mix flour, cinnamon, cloves, ginger, nutmeg, baking soda, baking powder, and salt; add the dry ingredients to the pumpkin/butter mixture and combine until well blended. Spread about 2/3 of the batter evenly into the prepared pan.

In a bowl, with an electric mixer on medium speed, beat cream cheese, 1 egg, 1/4 cup sugar, and ½ teaspoon of vanilla until smooth. Spread cream cheese mixture evenly over the pumpkin batter. Dollop the remaining pumpkin batter over the cream cheese batter and spread out as evenly as possible. Use a table knife to swirl together the cream cheese and top layer of pumpkin batter. Bake for 30-35 minutes, or until the center of the pumpkin batter springs back when touched. Cool completely in pan, then cut into bars.

Tuesday, April 10, 2012

Molten Chocolate Cake for Two


That man of mine is in Vegas with the guys...

Yes, it's scary.


But he works so hard, he deserves to play hard every now and then know what I'm sayin'?

It just means sleepless nights and lots of wine for the girlfriend...but relationships sometimes require sacrifices right?

One more day and I can sleep again. ;)


I bring him up because this dessert was how we ended our Valentine's dinner this year. I'm the chocolate freak but even he floated out of his chair a bit after taking a bite into this.

What's great is this is a recipe for two.

Cute right?


Molten Chocolate Cake for Two
From Traceysculinaryadventures.blogspot.com

Ingredients:

2 tablespoons unsalted butter, at room temperature
2 oz bittersweet or semisweet chocolate, chopped
1/4 teaspoon vanilla extract
1 large egg, at room temperature
2 tablespoons granulated sugar
pinch of salt
1 tablespoon all-purpose flour
cocoa powder (for the ramekins)
confectioners' sugar (for dusting, optional)

Directions:

Preheat oven to 400 F. Generously butter two 6-oz ramekins and dust them with cocoa powder.

Place the butter and chocolate in a microwave-safe bowl and microwave until melted and smooth. I like to do 30-second bursts at 50% power and stir in between each. In total, it'll probably take about 1 1/2 - 3 minutes, depending on your microwave.

In a medium bowl, beat the egg with a hand mixer on medium-low speed until foamy, about 1 minute. Increase the mixer speed to medium-high and continue to beat until the egg forms soft, billowy mounds, about 1 minute. Still beating, gradually add the sugar and salt. Once incorporated, beat for another 5-10 minutes, until the mixture is very thick and pale yellow in color.

Use a rubber spatula to transfer the egg mixture to the bowl containing the melted butter and chocolate. Sift the flour over the top, then use a rubber spatula to gently fold everything together, just until incorporated.

Divide the batter between the prepared ramekins, smoothing the tops with your spatula. Put the ramekins on a rimmed baking sheet and bake for 10-13 minutes, or until the cakes have puffed slighty and jiggle just a bit in the center when gently shaken. Immediately upon removing the cakes from the oven, run a knife around the edges of the ramekins. Invert the ramekins onto serving plates and let them sit for about 1 minute or so, until the cakes release from the ramekins. Remove the ramekins and, if using, dust the cakes with confectioners' sugar then serve immediately.

Saturday, April 7, 2012

Easter Bark


Happy Easter weekend everybody!


I hope everyone has a wonderful holiday...with lots of food. Lots.

Ham. Candy. Lamb. Candy. Candy. All the above.


If you're still trying to throw together something last-minute and quick (much like myself) then this may be a good option for you. This takes about 5 minutes to whip together and look how festive it is!

It screams "Easter"! And "eat me, I'm delicious and all pastel-y"!


Easter Bark
Adapted from yourhomebasedmom.com

Ingredients

14 whole Golden Oreos, broken up.
1 C pretzels, broken into pieces
1 lb. white chocolate, almond bark or melts found in the bulk food section
1 C Easter peanut M & M's
1/2 C Easter pretzel M & M's
Pastel-Colored or Easter themed sprinkles

Directions:

Cover a large cookie sheet with wax paper. Spread broken cookies, pretzels and about 3/4 C of the M & M's onto the waxed paper.

Place white chocolate in a container and microwave for 1 1/2 minutes. Stir and then microwave for another 30 seconds until melted and smooth. White chocolate melts faster and burns easier than chocolate.

Drizzle the melted chocolate over the cookie mixture, spreading with spatula if needed to coat evenly.Sprinkle remaining candy corn and colored sprinkles over the chocolate while it is still wet. Do not let it harden.

Place cookie tray into refrigerator until set and firm. Remove and gently break bark into small pieces.

Store in air tight container.

Wednesday, April 4, 2012

Breakfast Muffin Cups


Yesterday was my baby's 2nd birthday!

Don't get it twisted...my "baby" is a 21 pound Pug.

I can't get over how quickly they grow up! It seems like just yesterday that I could hold him in the palm of my hand :(

See? He really IS a baby!

I felt kind of bad because I had absolutely no free time to bake him any special treats or anything so I resorted to giving him an abundance of treats...not the best idea with pugs but hey, birthdays only happen once a year right?!


LOTS of treats...


Something that I find to be a wonderful "treat" is a hearty, wholesome breakfast. The kind that makes you actually WANT to get out of bed in the morning.

I don't know about anyone else but I generally shout out a bunch of profanity (in my head usually) when I hear my alarm go off. It can be 6:00 AM or 11:00 AM, it doesn't matter. BUT. Yes, there's a but. BUT if I know there is a good breakfast to be had...the profanity decreases significantly.


This recipe is something I came across on Pinterest...been saying that a lot lately, about EVERYTHING. I made these for that man of mine and I for one of our usual Monday morning breakfasts and we both gave them two thumbs up.

I like them because they're versatile and you can put pretty much whatever you want in them. We made different kinds. Some had mushrooms, some had peppers. It was a nice variety and they were easy to whip together. We could enjoy our coffee and "The Price is Right" as they baked in the oven.

Good morning to us.


Breakfast Muffin Cups
Adapted from Littlebirdiebaby.blogspot.com

Ingredients:

1 24 oz. bag of shredded hash browns
1 small onion, chopped
2 tsp sea salt
1 tsp pepper
2 tbs olive oil
1/3 cup shredded reduced-fat cheddar
Turkey bacon bits or 8=10 pieces of cooked bacon, crumbled
Eggs
Extra shredded cheddar

Directions:

Take your bag of hash browns and mix in the salt, pepper, onion, oil and 1/3 cup shredded cheese. Divide amongst the cups in your muffin tin, making sure to grease tin beforehand.Bake hash browns at 425 degrees for 15-18 minutes or until toasty.

Once they're finished, take them out and lower the temp of the oven to 350 degrees.
Crack an egg into each of the cups.

Top with bacon and a sprinkle of extra cheese
Bake at 350 degrees for 13-16 minutes (or until the eggs are as firm as you like them).
Slide a knife along the edges to remove from pan when cooled.

Monday, April 2, 2012

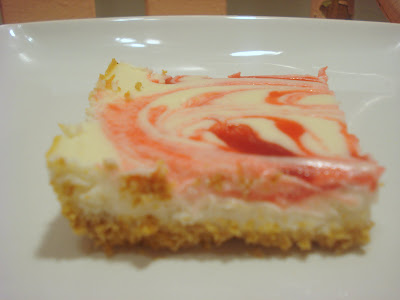
Light Strawberry Swirl Cheesecake


It is not easy to find a healthy/lighter dessert that doesn't taste healthy or light.

But when you do it is bliss...pure bliss.


You mean I don't have to feel an intense wave of guilt and vivid visualization of me literally killing myself at the gym with every bite? Sign me up!

This is one of those desserts. It is creamy and delicious much like your average "full-fatted" (yeah, I make up words) cheesecake but it harbors much less guilt.

Go on, do you're little happy dance. I have one too. No shame, no shame at all.


Light Strawberry Swirl Cheesecake
From Skinnytaste.com

Ingredients:

non stick cooking spray
1/2 cup crushed graham cracker crumbs
1 tbsp light butter, softened
8 oz package reduced fat cream cheese, softened
1/4 cup sugar
6 oz fat-free vanilla Greek yogurt
2 large egg whites
2 tbsp lemon juice
1/2 tsp vanilla extract
1 tbsp all purpose flour
1/4 cup sugar-free strawberry jam

Directions:

Heat oven to 350°. Coat an 8-inch square baking pan with non-stick spray.

Mix together graham cracker crumbs and butter with a fork until evenly moistened. Press evenly into bottom of prepared pan.

Gently beat cream cheese, sugar and vanilla until smooth using an electric mixer. Gradually beat in fat free yogurt, egg whites, lemon juice, and flour. Do not over beat. Pour over graham cracker crust.

Stir jam until smooth. Drop by small spoonfuls over surface of filling. Using a knife, swirl jam gently through filling to create marble effect.

Bake 25 to 30 minutes or until center is almost set. Cool to room temperature. Chill a few hours in the refrigerator.

Sunday, April 1, 2012

Cheese and Rosemary Breadsticks


I wish I could make a living off of food blogging.

I'm just saying...how nice would it be to cook and eat all day and then write about it? I would never have to get out of my pajamas.

That sounds good to me! Though being a "professional food blogger" would probably mean that I would need a really expensive legit camera (does an iPhone count?!), and know what I'm doing with it. I would also probably need some formal culinary training...or some English/writing education or something.

Hobby it is!


I am nearing(ish) the end of my 6th and final year of college and therefore my brain has been spinning with the "what-ifs" and trying to visualize where I am going to be upon graduation.

Kinda weird.

Carbs. Carbs fix that right?


That was the only transition I had :) These breadsticks rock. They look all fancy and time consuming but they are sim.ple. You could easily trick people into thinking you slaved over these babies (April fools!).

That man and I made these to go with our romantic Italian Valentines day dinner. We loved them.

My only complaint would be that the best way to reheat them the next day is in the oven. And we all know I'm not patient enough to wait that long.


Cheese and Rosemary Breadsticks
From Foodnetwork.com

Ingredients:

1/4 cup grated Parmesan
1/3 cup grated Gruyere
1 teaspoon chopped fresh rosemary leaves
1 (11-ounce) container refrigerated breadstick dough (recommended: Pillsbury)
Finely ground sea salt, optional

Directions:

Preheat the oven to 350 degrees F.

Line 2 heavy large baking sheets with silicone baking sheets or parchment paper. In a food processor, chop the Parmesan, Gruyere and rosemary together until coarsely chopped. Set the cheese mixture aside. Separate the dough strips. Using a pizza cutter or a large sharp knife, cut each dough strip in half lengthwise to form thin strips. Working with dough strip at a time, coat each strip with the cheese mixture, pressing very gently. Twist each cheese covered dough strip and place onto prepared baking sheets. Sprinkle with the salt, if you wish.

Bake until the breadsticks are golden brown, about 10 to 15 minutes. Transfer the warm breadsticks to a basket and serve.

*Instagram pictures anyone?*

One of my dream homes :)

Pumpkin patch!=LOVE

A jellyfish that man of mine and I admired at the aquarium in the Mall of America
Related Posts Plugin for WordPress, Blogger...